- No Obligations
- Stop Paying Too Much For Your Contractor
- No Spam Calling
- Screened & ID Checked Contractors only!
Faux Brick Wall: The Best Tips to Make It Look Real!
0
 Faux Brick Wall: The Best Tips to Make It Look Real!
earlyexperts.net
Faux Brick Wall: The Best Tips to Make It Look Real!
earlyexperts.net
A fresh coat of paint on the walls can definitely help add personality to a room. Sometimes though, this can look a little–well, flat. You may want a little more flair and texture on your walls. Maybe a more industrial look is more your speed, but you don’t live in a trendy city loft or an older renovated building. These are normally where you can find walls that are a little rough around the edges.
Don’t feel discouraged though. You can bring this look into your home. Faux brick wall panels have become popular as an easy way to give walls more of an edgy, unique appearance. Plus, faux brick is customizable. Giving it a more realistic look requires just a bit of paint and experimentation. If you don’t know where to start, never fear. You can give your walls a new look using these tips and tricks.
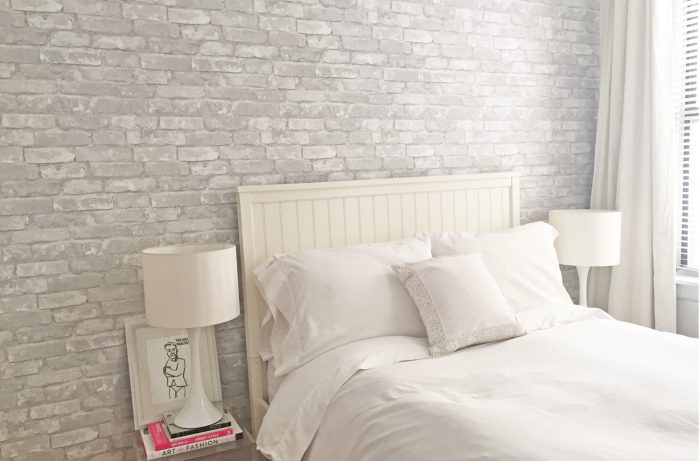
Creating a Textured, Whitewashed Look
Also known as the German smear, this method of adding texture to walls has been used for centuries on smaller cottages and castles in Europe. While this is very similar to whitewashing walls, there is a difference in the materials used. Normally when whitewashing walls and brick, you would use diluted white, latex or acrylic paint. With the German smear technique, instead of paint, moistened mortar is used to give walls a washed out look with a rough and rugged texture.
Materials Needed
- Whitewash*
- Wall Spackle
- Spackle Knife
- 2 Grout Sponges
- Paint Tray
- Paint Brush
* For the paint and water mixture, it’s best to start off with a lower solution–25% paint to 75% water is a good ratio to give the walls a slightly whitish tint.
Step 1 – Prepare the area by laying down a protective plastic or cloth cover on your floor to prevent any paint or spackle for damaging your floor. Use painters tape to protect any walls or surfaces where you don’t want spackle or paint to touch.
Step 2 – Using a spackle knife, begin to apply it in a smooth layer on top of the faux brick wall panel. It’s okay if it’s not even. This helps to give it an industrial appearance. Make sure that the spackle also gets into the grout area between the individual bricks. Use a dampened sponge to wipe away grout if there is too much on the wall.
Step 3 – Depending on how white you want the walls to be, you can leave the walls without any additional whitewash. This will leave the brick more exposed. A mixture of 25% white, acrylic paint and 75% water will give the walls a slightly more covered look. Yet, the brick will still show through the wash. You can also create a 50/50 mixture that will end up giving your walls a more solid white surface.
Creating an Aged Brick Wall
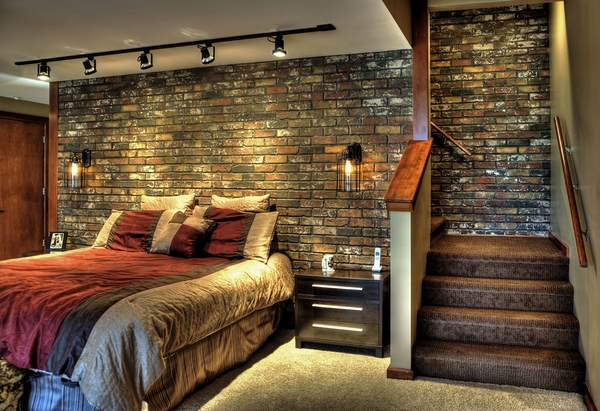
Aging a faux brick wall can give a room a more rustic, well-worn look. Coupled with warm decor and comfortable furniture, your living room, bedroom or even dining room can be made to feel like a warm and cozy space. Luckily, creating visual depth on these walls can take them from fresh out of the box to classically aged. You can easily create this sophisticated look using a few tools while channeling your inner designer.
Materials Needed
- Acrylic Paint*
- Wall Spackle
- Spackle Knife
- 2 Large Grout Sponge
- Paint Tray or Cookie Sheet
- Paint Brush
*These are the recommended colors: dark red, brown, black, brownish gold, and white
Step 1 – Cut your sponges in half horizontally so that they closely match the length of the individual faux bricks. It doesn’t have to be a perfect match but this makes adding the paint easier.
Step 2 – Pour a little of each color in your paint tray. Make sure that you do not stir these colors together since you’ll use the sponge to do do that.
Step 3 – Take one sponge and dab a little of each color onto it so that you are able to put it on the individual bricks. Be careful not to drench the sponge in paint.
Step 4 – Start applying the sponge to the bricks randomly. For the best application, gently dab the paint on the wall instead of creating thick smudges. This will help create a more natural pattern. Keep going back to your paint tray for more paint to add to both the sponge and wall.
It’s okay that the colors are not yet blended together. You’ll do that in the next step.
Step 5 – Take another sponge without any paint and slightly dampen it with water. Begin gently blending the paint into the brick–blotting the sponge on the wall a little at a time. This will help the colors appear as a naturally distressed surface on the brick.
Step 6 – If you want to give the walls a slightly whitewashed look, dampen another sponge and dip just the edge of it into the white paint. Begin to gently brush it against the brick to add a slight layer of white on the surface. A little goes a long way here, so it’s best to work in smaller areas.
Step 7 – For more texture, go in and with a little grout and add a layer in between the bricks using your finger, grout tool, or even a wooden clay tool with a rounded edge.
Conclusion
While faux brick looks nice on its own, you can take it to the next level by adding a German smear, whitewash or colored paint. The industrial look of exposed brick combined with your good design sense will achieve a stylish look that you can be proud of. When it comes to putting a personal touch on your home, faux brick is an inexpensive way to update your space. Any wall can be given more interest using this material. The best part is that you can customize it to look like it was done by a professional faux painter. It sounds like this a golden opportunity to put your interior design skills to work.
Most Read

How To Prep Garage Door For Painting
Jan 31, 2018