
How to Remove a Stripped Screw: Tips & Video Tutorial
We put together a very detailed guide on how to remove a stripped screw. We included a video tutorial and professional practical tips.
Do It Yourself, DIY for short is an area most of us practice in our homes in one capacity or another. Whether it be a simple job like nailing in a pin or hook to hang a picture, building a flatpack piece of furniture or building a complete decking, all of these class as DIY and all of them require unique and precise ways of working.
Despite every job having their own unique techniques and instructions, there are often quite a few similarities, these can range from tools to the installation. One of the most common similarities is the use of fixings, usually in the form of screws and that brings us to what we are here to discuss. To be a little more precise, what I really want to discuss is what happens when a screw head gets stripped. I will then run through the methods and means of removing screws once this unfortunate and usually avoidable scenario happens.
This may seem like a bit of a trivial subject but we can tell you it isn’t. There are few things worse than when you start to fasten pieces of wood, metal, plastic, and masonry together, to have the drill or screwdriver slip and mash a screw head. If the drill is at high speed you may strip the screw beyond the point of being able to simply switch a drill to reverse and being able to power it out.
As much as this is frustrating and inconvenient, it can also be a major fail point for your project as is could leave a screw head open for degradation or even weaken the screw itself to the point of complete failure. A snapped screw is the last thing you would want if the said screw was supporting something like a safety barrier.
The above problem is what we shall tackle in this article. We will first discuss a few different screw types, the standard methods by which to get them out once they stip and then the specialist tools you can use if they are too far gone.
We want this article to act as a reference point for you, with easy to follow steps then increase with the severity of the stripped screw. It will serve as an easy to navigate guide, helping you to solve this terribly frustrating and time-consuming problem as it arises according to the type of job you’re doing.
Cause
It seems logical to start with what actually causes this terribly inconvenient problem then, simply put this is too much or little pressure being applied when turning the screw, an incorrect screwdriver head for the screw socket type, a poor quality screwdriver head or poor quality screws. All these factors play a part in the likelihood of a screw getting mashed up. There is also about an even chance of causing a stripped screw from using both hand and power tools so one will not save you over the other.
So when you are working then and your driver does slip, the corners of the socket become rounded and/or sheer off, if you carry on turning then eventually the female socket will become completely stripped and offer no grip at all, this is especially an issue for getting the screw back out. Worse still is if you use poor quality screwdrivers or drill adaptors then these can also break or round. The problem may occur faster when using a power tool and adaptors because you have a mechanical force turning at speed, in this sense a socket can become rounded faster than when using a hand-held screwdriver.
Effect
Now you know a little about the cause of a stripped screw head, we can begin to work through the prevention. Imagine you are doing a job, you have felt the jolt or snap as the screw has started to become rounded, what do you do? If the screw is halfway in a job then despite the initial temptation to carry on screwing it in with the hopes of completing the task, don’t. Forcing it is hopeless and is almost guaranteed to ruin the screw head further whilst making it a lot harder to remove in the future.
If the scenario arises where you have forced it into the job despite a break or the head has not stripped until the screw was all the way in the job, there may be the thought to leave it where it is, I mean it’s in the desired location right so surely it’s not hurting anything? Here we have to advise the opposite. You see once the screw has made it into the intended object then rounded, it is open to corrosion, especially if it is for outdoor use. Weather protection is usually supplied by a coating of plate-like nickel, and once the head is mashed, the inner metal is exposed and able to rust.
What you need to consider is the fact that if the screw is inserted correctly but is stripped, it then becomes rusty and corrodes, will you be able to remove it at a later date? Worse still what if the rust eats through and breaks the screw head, that screw could be holding up a railing for a garden meaning that any weight now put on the railing and screw will be unsupported. This could lead to a potentially fatal situation at worse, serious injury at best.
Aside from the potential danger, there is a lot to be said for doing a job right the first time instead of cutting corners, leaving a mashed screw head in a job it cutting a corner and future you will thank past you unconditionally for making their life easier.
Prevention
This is worth noting since we have gone through cause and effect. Prevention they say is cheaper than the cure and this job is no exception. By taking the necessary steps you can avoid the heartache of stripping a screw head in the first place. The steps to always consider before you even start a job are your materials, are they right for the job and do you thus have the correct, corresponding fixings?
Next, consider the fixing type in relation to the tool you intend to use to fasten it in place with. Since we are more or less limiting this to a screwdriver or a power tool/ drill, ensure that you are using the correct adaptor type for your screw.
These are a few of the most important considerations when starting any job along with the quality of tools and screws, using second-rate or cheap parts will set you off on a path to failure from the beginning so be aware.
Screw Type
This plays a huge role in determining what screw will be suitable for what job. Ranging from your basic wood screw to self-tapping, each has their own unique head type. The four most common head types are listed below:
1) Flat Head or Slotted Head
These are steadily becoming less relevant in modern time, they were traditionally used in homes and industry and where one of the earliest screw types to be invented. Modernly, they are now getting replaced by stronger, more high tech alternative head types. This screw had its time and day thanks to the ease at which the screw and driver could be manufactured, repaired and replaced in a time when advanced machinery was lacking.
2) Phillips and Fearson
These are two very similar variants of the same screw type. This consists of a single cross with one coming to an abrupt end while the other is more pointed. These are a stronger alternative to the flathead since the cross allows for more surface contact when screwing.
3) Pozidriv
This often gets confused with the Phillips’ head as it effectively looks very similar. This head looks more like a star though since it has a single smaller slot in-between each of the bigger slots. This screw type is considered a bit more of an industry standard as it carries the title of being able to cope with the most torque when tightening compared to all other standard screws.
4) Hex Head
This type of head is most commonly found on hex bolts which aren’t a subject we are covering here, what we will cover however is the self-tapping screw which coincidently uses a similar hex head design. These use a socket to tighten and can just as easily become stripped, especially if using a wrong adaptor.
Use
Having covered the most commonly used screw types for the home DIY project what we should consider next is the intended use for the screw, this will directly relate to the head type. Although there are far too many uses and variants to go through in this article, if you are unsure before you start a job, you should ask your local DIY store clerk or supplier for their opinion on the matter or better still simply look at the packaging. Nowadays, stores and manufacturers almost always put a section on the label stating if they are intended for indoor or outdoor use.
The main point here is to ensure you have the right screw type and size for the task you are about to undertake.
Screw Driver and Drill Adaptors
It is essential that once you know the job and screw type that you don’t fall short at the last hurdle. In this case that comes in the form of your screwdriver or power tool adaptor. It is an absolute necessity that you choose the right driver type for the choice of a screw. This is usually designated by a number that corresponds to your tools size. Failing to locate any designated number the best way is to simply measure a screw against you adaptors or screwdriver selection until you find one with first the right blade pattern and second, that is the perfect fit.
Using a tool that is the wrong size is one of the most common and easily made mistakes that can lead to a stripped screw.
Correct Powertool Setting
It is essential when using a hand drill or electric screwdriver that you have the right setting. Having the speed set too high could lead to slipping and too slow may not generate enough speed to get the screw through the material, this, in turn, could cause the screw to stop then the adaptor to spin in the socket.
As well as the speed you also need to consider the drills mode setting, for example, you don’t want to be in hammer mode nor really in drill mode, ideally use the torque setting and find the right range for your material.
Pilot Holes and Material
While on the subject of power tools and hand drills, a major consideration should be first off.
If for example, you are drilling woodscrews into a decking, consider piloting your holes first. Doing so allows room for the screw to enter the material with less resistance along a predetermined path. This allows for smoother handling and less risk of the screw stopping abruptly which will again cause the head to get damaged, since the screw stops but the electric drill will not.
If you are drilling say self-tapping screws into a roofing or corrugated panel, pilot holes may not be necessary unless the screw type lacks the sharp, cutting point, another consideration when you choose the fixings.
For indoor and outdoor use into masonry, you will generally use plastic wall anchors. With these, make sure you have the correct size hole drilled at the correct depth for the plastic anchor to be fixed into, once secured use the correct size screw to attach whatever object you are securing. To be extra safe you can often buy a big bulk box that has the correct screw for anchor type, then all you need is the correct size tool for securing them and you are sorted.
Package Included Screws
These are the absolute starting point for any and all DIY projects. It doesn’t seem to matter what you buy, whether it be a TV wall mount kit or a set of draws with a brackets for securing to a wall, the manufacturers in their absolute generosity give you free fixings, these usually come in a small packet that consists of several plastic wall anchors and an equal number of screws.
Very generous of them right, and as tempting as it may be to save a few cents by ripping it open and using them, for the novelty if nothing else. We advise you don’t. Here’s an alternative though, throw them away as fast as you can. These fixings are absolutely notorious for being the poorest quality available, they are as likely to strip or snap than actually screw in properly, if they do then the likelihood of the screw head stripping or snapping off are almost guaranteed. We can’t really offer much advice here about removal because the genuine answer from the off is to throw them away and use some of better quality from your local hardware store.
Removal
Having spoken now about the most common causes of a stripped screw, the effects they have, and a few ways in which to avoid it, we need to move on to the removal of a screw presuming you have managed to strip in any way.
If you have, don’t think there is any shame or even that you necessarily did anything wrong, there are many reasons a screw can strip, even down to a faulty screw in a box of otherwise well-made products. Either way, it’s what we are here to talk about so let’s begin.
For the purpose of an easy to follow guide, we shall start from least to most aggressive forms of removal with helpful headings.
Reversal
Stopping the motion and then going in reverse is the most basic of all starting points with any screw of more or less any design. The second you feel, hear or see your driver slip in the head of the screw, stop screwing forward and go in reverse instead, this means turning your screwdriver the opposite way, anti-clockwise for most standard thread patterns would be classed as reverse or loosening.
Providing you have not kept tightening the screw after the initial break, the head should still be intact enough to alter direction and loosen it out.
If this method works, then once removed throw the screw away, never try and reuse a screw since it is now damaged. Also, check your tool or adaptor head to ensure it is not also damaged. If not then before you try again, consider why the driver slipped in the first place? Was there not enough pressure to force it through or perhaps you ran across something hard in the material? If so then consider piloting the hole again, drill the hole deeper for your wall anchor or simply change locations if possible.
If you are trying to reverse a screw out with a power tool then consider stopping and easing it out by hand instead, use a screwdriver as this gives you more control and takes the process a bit steadier.
Hammer & Pressure
Under certain circumstances, if the reversal method has not worked then you might need to apply a little more force to help the driver get a grip of the screw head. There are several methods to achieve this, the first is to gently tap a hammer against the handle end of your screwdriver. Be careful when doing this against plastic or wooden handled tools as they may splinter or shatter.
The variety of screwdriver you can find below linked are designed to absorb the impact of a hammer since they have a metal reinforcement plate over the handle. The one linked is for a single screwdriver, you can buy them for any size or design and build up your collection. Also if you decide to go with this option, you should be able to buy a complete set from your local hardware store or tool supplier.

When using simply put the correct size or slightly bigger screwdriver into the screw head that is damaged, give is a few gentle to firm taps and see if it has managed to grip properly. If so then steadily begin to turn in the correct direction to unscrew it, once clear then unscrew as normal.
The next option up from here is a device called an impact driver. The nifty gadget, is designed to harness the brute force of a hammer strike to unscrew a screw. Often these types of tools are used when a larger screw has been in an object for a long time and is struggling to otherwise come out, maybe it is rusted or has thread lock on it. This device converts a hammer blow into a force that is then used to turn the screwdriver end.
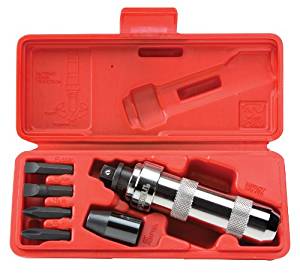
Although their primary use is more erred towards an industrial environment, if you have one in your tools box then it could work to help carve out and grip the screw head and then force it out.
There are smaller options available that are catered more towards in-home use but speaking with your local hardware supplier might be a good option here.
If you come across a scenario where no type of driver tool will work because the head of the screw is completely rounded then we may need to get a little more aggressive.
Before we hit the complete destruction part then we want to tell you about a simpler way that is almost an absolute guarantee to work and remove the entire screw, or at the very least it will allow you to break off the stud and place a new screw in a new location without the damaged one being an issue.
This is the twist drill method.
Using a twist drill bit that is the same size or slightly bigger than the screw shaft, tighten it in a power drill, then carefully drill the head. Take it steady and drill carefully, keep the pressure on until you feel a slight pop. Once you do, it means the head is no longer holding an object down and you are now free to remove the object from under the screw. With the remaining exposed stud, use a pair of pliers and unscrew it.
If you don’t have to use the same hole again then an easier option might be to simply snap off the exposed stud with a hammer or pliers by moving it from side to side.
Once broken tap flush with a hammer and carry on.
Destructive Method
This is just about the last solution available which relies mostly on brute force. If you have tried reversal and a few other methods but find you have now completely run out of options then it’s time to get rough.
First off see if and what material can be removed from around the screw. If for example, you are dealing with a decking board, are you able to cut and replace it? If so then cut or chisel out around the damaged screw. Once the rest of the board is free then break off the excess wood around the screw, this will expose the head and body which can be used to extract the rest of the screw.
Again there are several ways to do the extraction itself, the most common is to slightly bend the screw over, not too far or you’ll snap it. Now use a pair of pliers to grip onto the stranded screw to extract it by turning it in a loosening direction.
This is one example but note this method can be used on a range of materials and in a number of scenarios, with the effort always being to first create a clear, workable space around the damaged screw so there is enough exposed to get pliers or a similar gripping tool around the screw. From here it is a simple case of working it free, usually by twisting or wobbling it out.
Chop Off
Following on from the more destructive means comes the simple effort of giving up with standard methods. If the screw is so tight into an object that even the pliers won’t work then there may be no other option but to simply break or cut the screw leaving some of the thread and body in place.
Having cleared a space around the screw then use a hammer to simply knock the screw in one direction, once bent then knock it back the other way. Once a stress fracture forms in the metal the screw will simply sheer off.
For thicker screws that might be located in more fragile material like breeze block, then using a hacksaw, simply chop off the exposed stud.
Hex Head Removal
We am adding this section because we mentioned another common type of screw head which was the hex head design. These use a socket style attachment for a screwdriver although commonly it needs a power tool, especially if using a self-tapping screw because of the force and speed required for penetration.
The most common way in which this type of screw becomes rounded is by using the incorrectly sized adaptor which can then turn and round off the socket completely.
If this happens then, because of the design of the head, it is unlikely you can simply switch your drill to reverse and power it out.
These use what is called a cap head design meaning the head of the screw sticks out from an object. This, in turn, means you can make a modification to the screw by cutting a single slit into the head using a hacksaw of cutting disk in an angle grinder, although be careful when doing so as a single slip could ruin any chance of salvage or cause harm to yourself or others. Once you have made a slit you can now use a flat bladed screwdriver to unscrew the fixing.
Modernly, the design of these hex screws have changed so that some are purposely manufactured with a slit or cross in the head so they can be tightened with other types of screwdriver, this means the same slit can also be used to loosen it.
Keep this in mind when purchasing as forward planning for these sort of potential eventualities can save you a lot of time and effort in the future.
Video Tutorial
Specialist Tools
Having now run through the usual ‘on-site’ methods, it’s worth talking about a few of the specialist tools available today for the sole purpose of extracting threaded screws.
The first one is a rather ingenious device that first drills a small hole in the head, clearing out any broken metal debris.
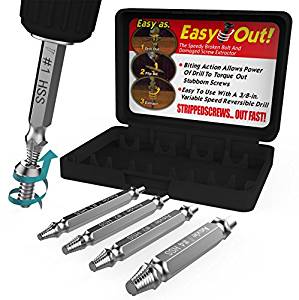
Once drilled out you swap the device over the threaded side. This actually drills into and threads the end of the screw until it hits the bottom, once it hits home the thread locks and the screw is loosened, this device works in reverse to the normal direction of threads, this means as the tool drills and locks into the screw, the screw turn anticlockwise so it comes out.
Tools like this, that allow for new and inventive means of doing previously time-consuming jobs are becoming more mainstream. So keep an eye out both in-store and online.
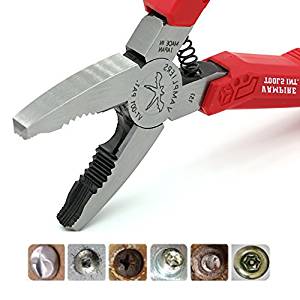
Vampliers are a modern remake of a very classic tool. These are unique in their ability to grapple raised screw heads. They offer a uniquely designed tooth pattern that runs in more unusual directions meaning they offer a lot of grip and stability, even when tackling rusted screws. These might be worth the investment so they can then be used in conjunction with a few of the other methods to ensure the job is complete with the least chance of damaging anything further.
Conclusion
Ww think it is important to note here that screws are fickle things, sometimes the best of quality can shred while the worst can work fine. There really is no telling what will happen but you can certainly stack the odds greatly in your favour by taking note of the advice given in the cause, effect and prevention sections.
When undertaking any DIY project, what is often forgotten is common sense, people tend to get carried away with manufacturer supplied instructions and YouTube videos. What you need to remember is that an assessment of your own individual circumstance is required and that thought is given to precisely what job it is you’re undertaking. From there figure out the right tools, materials and working methods to get your job done.
Stack these odds by checking you have the right tools for the job with the right fixings for the right materials and you should be fine when undertaking any task that requires this type of work. There are countless videos on the internet but most importantly and most helpful I would say is to ask at your local hardware supplier when purchasing materials.
We want to thank you for reading this and hope it has given you some great insights, tips, and links to useful products.