
Dryer Vent Cleaning Guide & Practical Tips
Our dryer vent cleaning guide includes practical tips and video tutorials on how to clean a dryer vent and the best products to use for the job.
If there was a list in the world that consisted of the most underappreciated inventions of the modern world we’re pretty sure the trusty clothes dryer would be on it.
It has given us the ability to have clothes, towels and textiles washed and dried in a single hour if needed and is now used up to an industrial scale. Dryers offer a versatile solution to a great many obstacles in the modern home.
The dryer is often overlooked and taken for granted in its ability to make life more convenient, what is not so convenient however, is when that dryer breaks down, what’s worse still, is when the dryer breaks due to issues that could have been very easily avoided, such as clogged outlets or a build up of dust.
In this article, our aim is to provide a simple walkthrough on cleaning the extraction exhaust of your dryer.
Although this may seem like quite a trivial subject we can guarantee that it is one you will thank us for, especially if this article is the reason you first decide to open up the cover and look inside, we dread to think what you will discover.
This understanding and knowledge of cleaning a dryer vent seem to fall into one of two standard categories, the first is those people who know how to not only maintain but also the importance of cleaning the dryer vent.
The second category is for those who have little or no knowledge of cleaning a ventilation system or the dangers of not doing. This is understandably down to it being one of those jobs that are so simple and far between cleans that it often gets forgotten about if it is thought of at all.
This short but detailed article will aim to benefit all audiences but especially those with no knowledge of how or why a vent and pipes need cleaning.
There are two major reasons a dryer vent will need cleaning so let’s look into these first before we hit our how-to guide.
Reason number one, over a long enough time frame, failing to clean a dryer vent and duct will be an absolute guaranteed fail point for any dryer, leading to slower and less effective drying of your fabrics while also causing potential harm to your dryer unit itself.
Also as this time frame increases between cleans, the efficiency of your dryer will deteriorate, meaning that your clothes will take longer to dry thus upping your energy bill.
The second reason is the potential for physical danger your vent can cause if not properly maintained.
The worse case scenario is fire. If you think about what the extraction tube and vent actually does, it moves the excess hot air and moisture from the unit when drying, with this flowing hot air comes a natural occurrence of lint fibers, fluff, hair and other textile materials.
Now here in the danger occurs, when you have hot flowing air moving swiftly over dry, flammable material then it doesn’t take much for said material to ignite. Consider how forest fires can ignite and the damage caused.
Well in this instance the forest is your home, at best the fire will start and fizzle out without spreading out of the pipe, this might go as far as to ruin your dryer unit itself which is a pain. At worse it can spread up the pipe, into the dryer itself then before long your whole house can be up in flames.
This may seem like a very exaggerated but this exact scenario is responsible for approximately 2900 house fires per year across the US alone. This results in about $35 million in property loss and damage, as well as injury and loss of life.
This is a huge price to pay for something so easily avoided. By taking 10 minutes to read this article you can be spared a lifetime of misfortune, so let’s get started.
Preparing to Clean
Extractor Covers
In preparation for cleaning then the first step is a safe isolation procedure.
To do this, first, make sure the machine is powered down fully and switched off. Next, if possible, disconnect the machine from the mains power. If not then make sure anyone around knows not to turn it on.
Next, after the unit is powered down, you need to find where the ventilation pipe exits through your outside wall. This is usually located on the nearest outside wall, in relation to the dryer. The outside vent itself will be located either higher up the wall nearer the roof or nearer the ground floor. Usually covered with a plastic or metal rain, dust and animal cover.
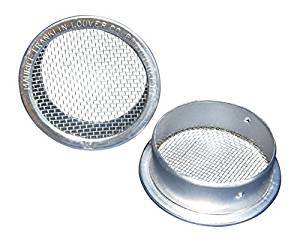
These covers come in a variety of styles and designs, some more effective than others. The cage-style design is best for stopping nesting birds and other critters getting inside. Their name suggests exactly how they are designed which is literally a metal or plastic mesh that covers the extractor hole. This design is not without its drawbacks, they have a tendency over time to get clogged up with fibers and debris which can lead to a dangerous situation of fire if not properly maintained.
You can find this style provided below:
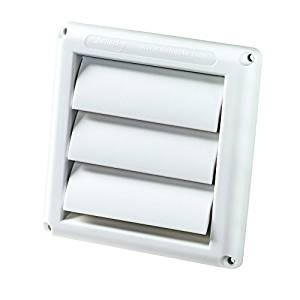
The other standard option available is a grill design, also known as the louvered design. These are best for avoiding a lint build up as the vents are large and move with the draft. They offer great protection against backdrafts and weather like rain and strong wind which a cage might not. These are a fantastic option but aren’t without their own drawbacks. The most obvious is that nature can find its way inside the pipe, especially nesting birds. This also carries a risk of fire and damage internally thanks to blocked pipes.
You can find one similar below:
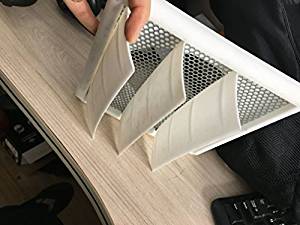
We have two standard designs then, and both have positives and negatives so what is the solution? Well, quite simply the answer is to invest in a crossover style vent that offers both great weather and backdraft protection with moving vents yet has the added protection of an internal grill that will stop birds and wildlife finding their way inside.
This style is probably the best option for the average home. They are available for a cheap price and are easy to install but sadly aren’t maintenance free. They will require a small amount of cleaning every few weeks or months. This is a small price to pay and means an hour once every few months can save you a lifetime of hurt. There are a few key rules and steps to follow to safely and effectively clean a vent, the likes of which this guide provides.
If you are looking for a reasonably priced, crossover cover that is effective and easy to maintain, here is a good option:
These vents are relatively easy to install the first time although if making a new hole for the extraction tube, extra steps will need to be taken that we won’t cover too much in this article. If replacing an existing vent or installing new, once your hole and ducting are in place then there are usually two standard methods of securing the cover, the first is builders caulk or silicon, the second is screws and rawl plugs.
The video below is an overview of how to replace a current vent but can also be used as a guide on how to install a new vent from scratch.
Cleaning
Having gone over the different types of vents then, we move onto the cleaning itself.
Before we begin the outside clean we need to first consider the inside. These days most dryers come with a lint filter fitted as standard. This should be cleaned on a regular basis, perhaps once a week depending on how heavy the use of the dryer is. Consider this the first line of defense as it helps to stop the extraction piper getting clogged up as fast. This will need to be removed and then cleaned by hand. Use a vacuum cleaner for excess debris, then either a brush, water or both depending on the filter type.
The chamber where the filter fits may also need cleaning. The easiest way here again is to use your vacuum head if accessible and suck out the lint.
Once the internal filters and drum have been cleaned and taken care of, you need to ensure safe isolation is complete and the vent cover removed or opened up if the cover has a hinge design like the one below:
Once opened or removed you should first off inspect the pipe. Doing so will allow you to make sure that the pipe does actually need a clean, as this may be a lot of effort to go to if it doesn’t. Having said that just because the inner foil tube may look clean it doesn’t necessarily mean it is. Try and clean at least once every couple of months to stay safe.
Presuming a clean is needed, the first stage is to use a vacuum cleaner. This step is often overlooked and people go straight for a brush or specialist tool.
Doing so prematurely will run the risk of pushing the debris further inside the ventilation pipe.
Vacuuming first will suck the excess lumps of lint and other fibers out, it will also help to loosen and bring forward the other material that is lodged further inside.
Simply bring your vacuum cleaner outside, attach any extension pipes you have and ideally a plastic or bristle tip to avoid piercing the inner foil tube.
Once attached then starting from the outside simply vacuum around the inner piper while moving further in. You can also lightly bang the pipe to help and dislodge debris.
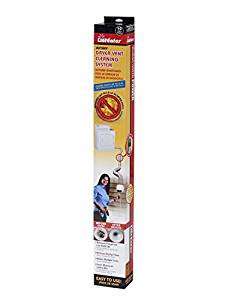
Once vacuumed then it’s time to bring out the specialist tools. That said don’t think this means big and expensive. There is a range of tools available that are specially designed to clean through vent piper by attracting lint fibers.
Here are a few products currently on the market.
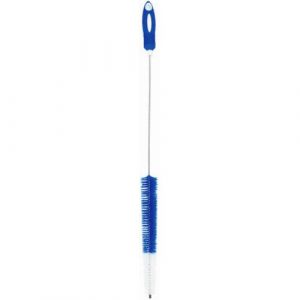
- Extendo Brush
These are the standard product for a good clean. These brushes usually feature nylon bristles or similar material that offer enough rigidity to scrub hard scale off the piper but enough flex to not damage them. Having an extendable handle offers greater reach inside. These brushes’ primary use is for straight sections of foil pipe, this is where the pipe itself goes in almost a straight line into your dryer.
- Flexible Duct Brush
This type of brush is a great alternative when the foil ducting is curved or laid out in a way that prevents a straight brush reaching the end. For example, if the ducting has an elbow in it. These snake style brushes reach around corners and have a lot of length to the cable, usually with room to extend if needed. The one we recommend below is sold as a kit. This includes an attachment that fits most standard, in-home vacuum nozzles. On this particular design, the brush itself is hand driven so turn as you force it through the pipe to make it easier.
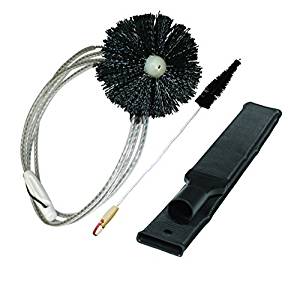
Below is a variant similar to the above only this style comes in easy to manage, screw together, flexible sections. The major consideration with this style of brush is to make a note of your thread direction. When you turn the end to force it through the piper, make sure you are turning in a direction, usually clockwise, that means you are constantly tightening the sections instead of loosening them. If you loosen, you run the risk of unscrewing a section which will be a nightmare to retrieve, especially over a long distance of ducting.
Some variants use a power drill to turn them. These have the advantage of more power behind them. Meaning they spin a lot faster and find their way through the duct easier. Again all these are good options and a decision should be made depending on the style, length, and layout of ducting you are cleaning.
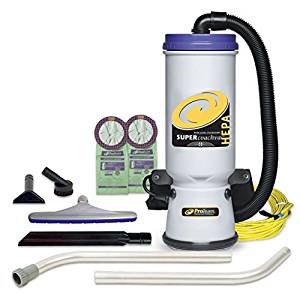
The final cleaning implement we shall cover for the ducting in this article is the high-end products since they exist and people will buy them. These types of products are usually in the form of multipurpose specialist vacuum cleaners.
High suction with a multitude of attachments really are the ultimate all in one tool but you will pay a premium at around $400. If this is what you’re considering then also think about the cost in relation to calling a handyperson to come and do the job. If there is someone local then the cost may not be justifiable. A professional will come, clean all relevant parts with their own tools, which means no mess, fuss or storage for you.
Cleaning the Cover
At this point we have a clean dryer unit and a clean air ducting. The job done, right? Simply place the cover back over and walk away. Well, as tempting as that may be this is actually wrong. Don’t forget to clean and check the cover. Cleaning is fairly straightforward either use a brush or wash in water to remove debris and lint build up.
What you also need to check is that all moving parts like vent slats, are still free and in functioning order, if not then this could affect the function of the dryer. Also, check that this cover itself is not bleached by the sun, this especially applies to plastic covers as bleaching can lead to damage to moving parts and plastic turning brittle which will reduce the effectiveness of the vent.
Once the vent is clean, using the instruction either supplied by the manufacturer or videos linked, re-attach the cover and that is job done. For a month or two at least. But you can rest easy knowing that is one less job and one less hazard lurking in your home.
Conclusion
There is a lot of information here that really should be known and carried out as often as possible. Dryer vents really are a major hazard in the home and can lead to a lifetime of regret if not cared for. It is a job that is so often overlooked or not thought of at all but this needs to change. For the sake of keeping yourself and your family safe then these simple, around the home jobs need to be taken care of.
For a decent summary of how to clean the ducting and vents, watch the video below.
Thanks for reading.