
Sunroom Ideas & Cost Guide & Contractor Quotes
In our sunroom ideas guide, you will find detailed information on how much it costs to build a sunroom as we well as up to 4 free contractor quotes.
A sunroom is known by many names depending on where you live and what its purpose is.
The room can be known as a:
- Sunroom
- Conservatory
- Orangery
- Garden room
- Solarium
- Greenhouse
- Atrium
- Patio room
No matter what they are called, we shall today be using the generic term ‘sunroom’ to describe the room.
What each of these has in common is that it is a room, joined onto the house which has more windows than you would normally have. Often the sunroom has a transparent roof as well as transparent walls.
Another thing they have in common is that they are designed to make as much use of the warmth from the sun as possible. It can be to benefit the people that live in the main house and give them access to a warm living area full of sunlight and able to be used for most if not all the year or it can be for the plants to protect them from the worst of the winter weather.
When compared to normal domestic additions to your home they can work out cheaper to build and provide more use. They will trap the sun’s warmth and not only provide a warm living area during the sunny yet cold days in spring and autumn but will heat up the rest of the house by warming the air and allowing it to move around your home by convection.
Some sunrooms are purely living spaces and some are more like greenhouses while others are a combination of the two.
Different types of sunroom
Apart from the names, there are differences depending on the style of the design.
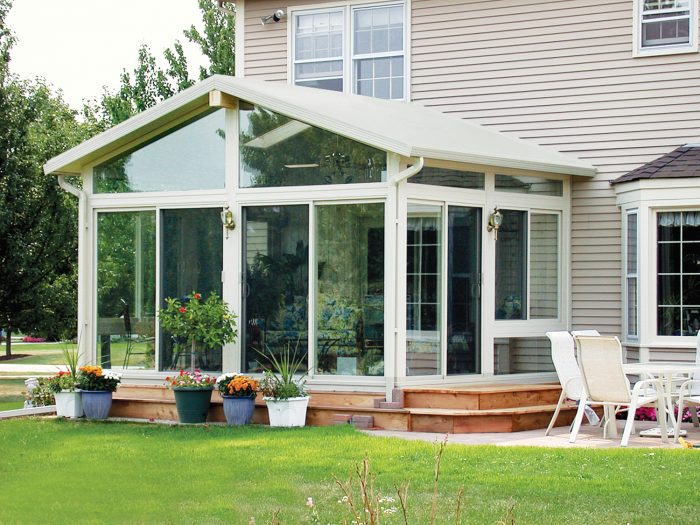
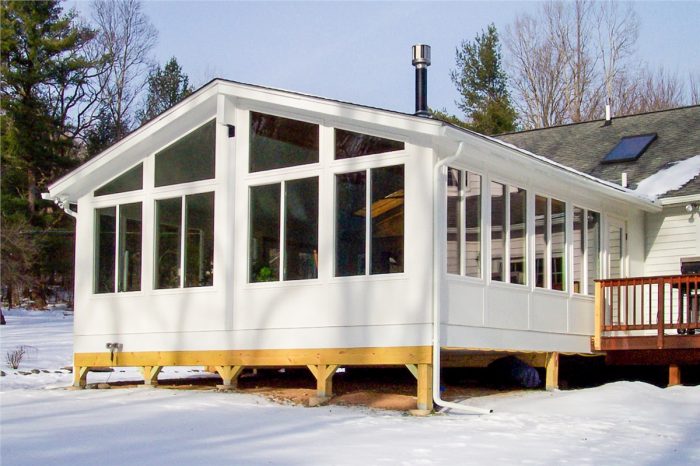
Gable. These are sunrooms with a ‘gable’ roof. That means there are two roof surfaces sloped away from each other to the sides and meeting in the middle at the ridge. This would be equivalent to a normal house roof with two surfaces and a gable wall at the end.
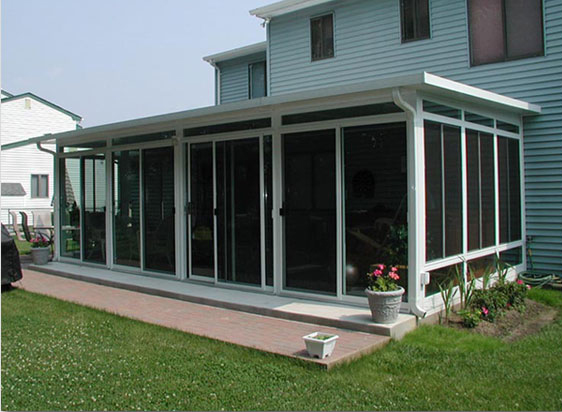
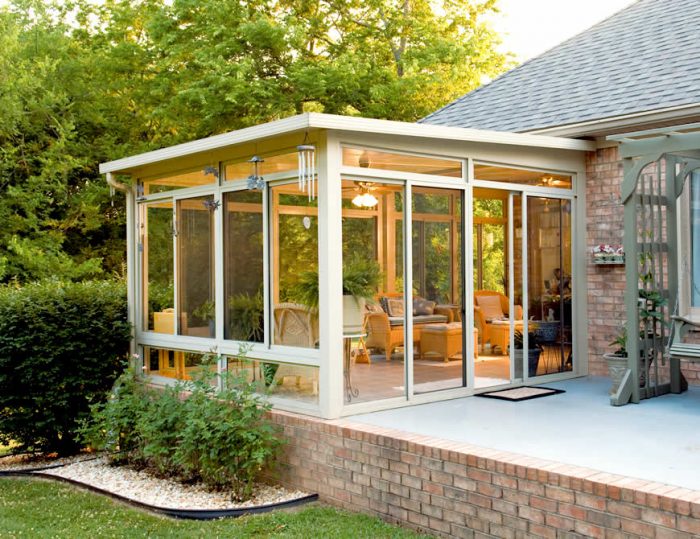
Studio. These are sunrooms with one roof surface sloping away from the house with the lowest edge furthest from the house. This roof would be equivalent to a sloped shed roof if it was built traditionally.
Enclosed porch. This kind of sunroom would be built under existing roof surfaces that had previously sheltered a porch. Basically it would ‘fill in’ the open sides of a porch. The new walls could be glass or they could be insect screens.
It isn’t only the roof design which has a bearing on the sunroom style; you can also have a three-season or a four-season sunroom.
Three-season sunroom. This is basically an outdoors space fully enclosed with single pane glass. It is therefore mainly used in the warmer months.
Four-season sunroom. This is actually a fully insulated extension of the house and is able to be used comfortably throughout the winter months as well.
Another variation to consider when choosing your sunroom is whether to go for:
A pre-fabricated kit. This is designed and fabricated by a manufacturer at a factory. They are transported to you either flat packed or as individual components that fit together and will require assembly on site. These are similar to a greenhouse and depending on the complexity and size can either be installed by the home-owner, an independent contractor or the manufacturer’s installation team.
Site built. This type is built by an independent contractor (but depending on your level of DIY skills, the homeowner could build it too) exactly like they would build a normal addition to a home. The contractor would build a foundation, concrete slab floor, framed walls, and roof. It will probably be wired for electricity as well.
Usually, the cost of the prefabricated kit is far less expensive than a site built version.
Whereabouts on the house should the sunroom be positioned?
Considering the position on the house is one of the major decisions you will have to make before choosing the type of sunroom you want. Let us assume for the sake of argument that you live in the northern hemisphere.
If you live in a cold or temperate area it would be best to choose a south facing location so that it receives most light and heat during the day.
If you live in a hot area then it would mean that a southerly aspect will require more cooling so choose a shady position.
Exposure to the east will provide light and warmth in the morning but shade in the afternoon.
A western aspect can expose you to hot afternoon sun which will need to be shaded.
If you are exposed to the north you will have lower light and heat levels and partial shade for much of the day. If you live in northern regions this can cause damp problems and be too cool but if you live in the warmer south then this may be fine and prevent the need for window treatments, additional shading, and cooling.
What materials can they be made from?
The materials that a sunroom is made from will reflect the price considerably. The framework will be made from one of three types of material:
Vinyl coated aluminum. This is a very popular material for framework construction. It offers the best combination of strength and insulation; it is least expensive of all the options, but unfortunately is mainly supplied only in white. The structural members can either be aluminum coated in vinyl or be made from vinyl with an aluminum internal reinforcement. This requires no maintenance other than a wash now and again.
Aluminum. This is not such a good insulator as vinyl coated aluminum but is stronger than vinyl so is often used for roof members.
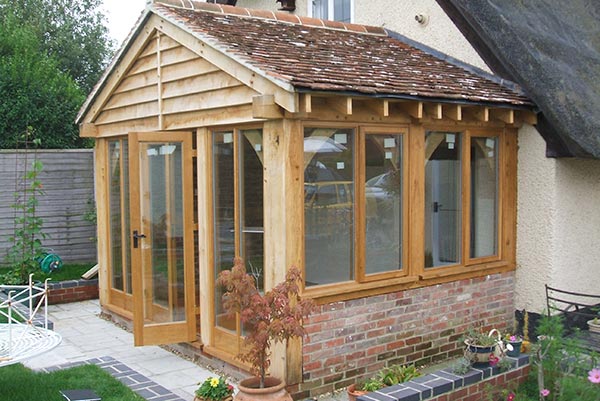
Wood. This material can be hardwood or softwood, with the hardwood option being far more expensive than the softwood. Wood as a general material is far more expensive than the other materials but can look much more attractive if stained and varnished properly.
Wood obviously will require periodic maintenance which will include an inspection for rot and insect attack as well as peeling varnish and sun bleaching.
Walls. Within the framing will be glass panels (usually double or triple glazed and can be bronzed to help with heat proofing.
Roofs. Roofs can be glass or more likely rigid polycarbonate sheeting, either single or double skinned. Glass on the roof can be very dangerous so the preference is for polycarbonate.
Glass. The glass will always be tempered to comply with various safety requirements of building codes and can be double glazed to prevent heat transfer.
Polycarbonate. There are various thicknesses of polycarbonate roofing sheets to provide insulation choices:
- 6mm. This twin walled sheet is probably the commonest and most popular roofing option.
- 20mm and 25mm. These two thicknesses provide a stronger and better-insulated roof.
Pros and cons of sunrooms
Although sunrooms give you extra living space at a fraction of the cost of a regular addition and give the advantage of seeming to be outside while being protected from the bad weather, a sunroom may not always be the right choice for your circumstances. Let’s look at the advantages and disadvantages of a sunroom and consider the argument for both sides before we choose.
Advantages
✓ Sunrooms are more affordable than a regular built addition. They are probably one of the most cost-effective projects you can do in your home. Not only are they more cost-effective they also are easier to maintain and offer far more versatility than traditional house additions.
✓ They allow natural light into your home. In fact, so much light is allowed into your home that you may be able to save on the cost of using electric lighting.
✓ Can make a small area seem large. Because a sunroom has so many windows included in the walls it has the effect of bringing the outside into the living area. This means that even a relatively small sunroom can give the impression of a large living area.
✓ The many psychological and physical health-giving factors attributed to natural light and warmth will make your sunroom worth every penny spent on it.
✓ The room is versatile. Unlike other rooms in the house, the sunroom can be used for just about any purpose. It can be a hobby room, a reading room, a lounging room or even a playroom. It probably would not be a good idea to use it as a bathroom.
Disadvantages
✓ There is no plumbing. It isn’t usual to provide plumbing in your sunroom, there just isn’t a need for it.
✓ Electrical wiring. Traditionally there isn’t any electricity wired to the room for lighting etc. Recently, however, there has been a growing need for electric lighting and power points to be available to allow the room to be used at night or to supply heating.
✓ The costs can be higher than expected. There are so many different extras you can include in your sunroom that unless you research it properly you can finish up with a room that has cost many times more than a regular addition.
✓ House resale. Although without fail a sunroom will give your home ‘kurb appeal’, it may not increase the value of your home.
✓ No privacy. A normal sunroom has many windows and often has a transparent roof. In fact, they are always open and bright and allow you to look out onto the world. Unfortunately, that also allows the world to look in on you. It is possible to fit adjustable blinds for a bit more privacy but remember that sunrooms are meant to let the light in.
✓ Most types of sunroom are not very energy efficient. Although on hot sunny days the warmth can heat up the whole house, on cold days or at night, the heat from the house can dissipate very easily unless you have an external door between the sunroom and rest of the house. A four-season sunroom is better as they are fully insulated but of course, these come at a higher cost.
Contractor built?
Most sunrooms come in the form of kits that can be installed by yourself as a DIY project, by a contractor that you hire or by the installation team that the kit manufacturer employs.
Although the room comes as a kit, do not be fooled into thinking that you don’t need specialized knowledge to fit it successfully. You still need to have good carpentry skills to install these things. Not only that but the kit needs a preinstalled concrete slab to act as a subfloor and it needs foundations to support the weight of the finished item. You will need someone to build those for you too.
Sunroom cost
The costs to build a sunroom can be summarised as follows. Prices are typical average amounts and can vary depending on where you live, the quality and style of sunroom and accessories you choose.
| Cost to build a sunroom | |
|---|---|
| Typical range | $8,000 to $80,000 |
| National average | $30,000 |
| Cost per square foot | $120 to $300 |
| Prefabricated kits | $5,000 to $30,000 |
| Labour | $4,000 to $20,000 |
| Building permit | $400 to $1,800 |
| Prepare site | $1,300 to $4,500 |
| Hire of construction waste container | $300 to $600 |
| Cleaning of site | $300 to $700 |
| Landscaping site | $1,500 to $5,000 |
Size matters! Don’t forget that the size of your project is probably one of the largest factors affecting your sunroom budget. It doesn’t really matter who the contractor is and what he does, whether he has given you a fixed price or not, it all boils down to the time spent on the job. If the sunroom has a large floor area then the price will be correspondingly higher.
| Costs of sunroom vs size | |
|---|---|
| Floor area | Price |
| 10ft x 8ft | $4,000 to $6,000 |
| 10ft x 10ft | $5,000 to $9,000 |
| 10ft x 12ft | $10,000 to $15,000 |
| 12ft x 20ft | $20,000 to $25,000 |
The following table shows the comparison between various different sunroom styles.
| Comparison cost of different kinds of sunroom | |||
|---|---|---|---|
| Style | Material costs | Labour costs | Total costs |
| Four-season sunroom | $15,000 to $55,000 | $7,000 to $20,000 | $20,000 to $80,000 |
| Three-season sunroom | $5,000 to $30,000 | $4,000 to $10,000 | $9,000 to $40,000 |
| Solarium (all glass enclosure) | $20,000 to $50,000 | $10,000 to $25,000 | $30,000 to $75,000 |
| Conservatory | $8,000 to $60,000 | $2,000 to $20,000 | $10,000 to $80,000 |
| Atrium | $4,000 to $20,000 | $6,000 to $15,000 | $10,000 to $35,000 |
Factors affecting cost
The variations in cost depend on many factors, most notably the quality of the sunroom you choose.
Four-season sunroom. These will use a lot of materials that the others may not, for example, insulation and roofing materials. The walls, windows, doors, and roofs all need good quality insulation and weatherproofing to retain cool air during the summer and warm air during the winter. Although the cost of one of these is much more than the other sunrooms, you get a much more versatile living area for your money.
Three-season sunrooms. This is also known as an enclosed patio. It is basically a less well-insulated version of a four-season sunroom. They work well in temperate regions but may become too hot in the summer and too cold in the winter especially at night.
Solarium. This is a fully glassed sunroom; even the roof is glass although using rigid double skinned polycarbonate sheets will be safer, lighter and better insulated. Obviously, because of the glass walls, the structure must be strong enough to cope with the weight and lack of flexibility of the material.
Conservatory and garden rooms. In its simplest version, this is a greenhouse to grow warmth dependent plants. You can purchase many accessories to help regulate the humidity and temperature, but accessories can be expensive.
Atrium with a roof. An atrium can be regarded as an indoor garden without a roof, a sort of central garden. If you then build a roof over it you have an interior room with a glass roof. The atrium is really good for supplying natural light on a budget for plants and people.
Sunroom ideas
We have seen that to build an averagely sized sunroom kit requires between $4,000 and $20,000 to actually install the sunroom. Your position on that scale will depend on the style and accessories you choose.
Consider the following when you are choosing your design as each will have an effect on not only the cost of materials but also the cost of labor:
Whereabouts is your sunroom going to be?
This will have a significant effect on design, will the location get direct sunlight or not? If it does then you will want to think about adding shades or tinted glass or some other way of protecting from sunlight.
Do you intend using the sunroom after dark?
You will need some electric lights installed. If you are installing wiring for lighting then you may as well add power points as well. That way you can watch television or some other activity needing electricity.
Do you live in an area that gets heavy snow or strong winds?
If so then you will need to take into account better insulation or a different design to withstand the extra loads.
Will you need heaters or a cooling system to allow you to use the space all the year around?
This will require electricity too.
Unless the sunroom you are considering is just a basic lean-to tacked onto one of the outside walls, you will need a building permit of some kind. An average sunroom will be at the lower end of the range shown previously but depending on the style and other aspects may become quite expensive. You must make sure you have the appropriate permits for the work you are intending before you start. If you don’t, and something untoward happens then your insurance company may decide not to pay out compensation.
Even if everything happens as per plan then you will have problems in the future if you decide to sell your house. Remember that permission usually takes between four to eight weeks for the application to be granted. So planning a sunroom is not likely to be a ‘spur-of-the-moment’ decision.
Remember you will need a foundation and a floor. Before you do this you must prepare the site ahead of the work. Typical steps include:
- Staking out the construction area
- Ensuring there is access to the work area
- Making sure there are power and water available
- Dig out foundations and area for subfloor
At the end of the job when the sunroom has been built you will want the damage done to your garden repaired. Hire a good landscaper to blend in the garden and make it look like the sunroom has always been there.
So we have talked about all these accessories and variations in the basic sunroom design. Approximately how much would some of this cost?
| Cost of sunroom variations | ||
|---|---|---|
| Insulation | $500 to $1,500 | The variation depends on the thickness of insulation and the type. As a ballpark figure you can estimate on $0.50 to $1.50 per square foot. |
| Type of roof | $2,000 to $7,000 | This range depends on the style of roof. Solariums require a glass roof with strong roof structure. A cheaper alternative could be rigid polycarbonate sheets for a transparent roof or a cheap asphalt shingle roof for an opaque roof. |
| Windows | $3,500 to $15,000 | Spend less on a three-season non-insulated sunroom and up to $15,000 for a high quality, fully insulated glass solarium. |
| Doors | $1,000 to $3,000 | Sliding doors are better as they provide a more natural transition from indoors to outdoors. You can also try French doors, telescoping and folding doors. |
| Electrical power point | $125 to $300 | Consider how many of each of these you will need before you start. Carefully choose where you want them and make sure your electrical supply can cope with the additional load. You may have to have an additional electrical box fitted to provide power to the sunroom. The extra cost of all of these might make you reconsider the uses of the room. Don’t forget you need to use a licenced electrician. |
| Ceiling fan | $145 to $350 | |
| Light fixtures | $145 to $800 | |
| Heating and air conditioning | $300 to $6,000 | The cheapest option is to fit window air con units and space heaters. Don’t forget these will add to your utility bills. |
| Expand ductwork to new space | $4,000 to $6,000 | If you have existing air con then you can expand the existing ductwork into the sunroom. |
| Finishing | $1,000 to $3,000 | Interior decoration may be necessary after the room is finished, however if the majority of the walls and roof are glass then you won’t have much area to decorate. You will need flooring however as well as furniture. |
| Flooring | $1,500 to $4,500 | You will already have a basic concrete subfloor but will need something to make it more attractive, perhaps hardwood flooring panels or vinyl? |
How about something a little less expensive?
All the discussion so far has been about building a purpose made sunroom complete with foundations and internal flooring. If your budget is tight and you already have a patio, you have the option of enclosing your patio. You will be building straight onto the existing patio floor and so won’t need proper foundations to support the framework, glass, and roof.
The idea of a patio enclosure can really be as simple or as complex as you can imagine. Some patio enclosures are merely screens to exclude the flying insects while others can be a full-blown sunroom with glass wall panels and glass roof. Of course, you can even attach it to the existing house and have access through an exterior door from the house.
The cost of building a patio enclosure once again depends on how complex you make it but the following figures give you an idea of the budget you need.
| Costs to build a patio enclosure | |
|---|---|
| Low end | $2,500 |
| High end | $40,000 |
| Typical range | $8,000 to $25,000 |
| National average | $16,000 |
What kind of patio enclosure?
As with all home improvement projects you have to have a clear idea in your mind before you start working out the design possibilities. There are three different types of patio enclosures you can choose from:
Fully enclosed. This is a completely built structure and will include foundations, stub walls, windows, doors, and roof. If you are having it fixed to your home then you will want the design to complement the existing architecture. You might even have electricity added for lights etc. The cost of one of these enclosures can be a minimum of $20,000.
Partially enclosed. This type is one where you do not fully enclose the patio space. You will usually have screens for insect proofing. You can have doors, windows or a roof if you want to. Typical prices for this type range from $5,000 to $10,000.
Sunroom. Usually, these come as a prefabricated kit. They are built in a factory and transported to your home where they are installed. Although they are usually very light and have lightweight transparent roofing materials and so do not really require a proper foundation, the manufacturer might specify a minimum foundation or stub concrete block wall to build up from. This will ensure protection from the weather. They will be made to your specifications. Typical prices range from $15,000 to $25,000.
Factors to consider when choosing one of these enclosures to include:
Type of roofing materials. If you have a partially enclosed type then there is no real advantage in having a transparent roof.
Do you require a permit? You will need to find out whether your proposed enclosure needs a permit or not.
Adding walls. You may need to build stub walls no more than two or three feet high to build your enclosure from or you may just need a few inches to lift the glass panel frame off the ground.
Adding windows and roof. Consider the design of the window panels and the type of roof you need. A lightweight roof would be safest and better than glass if you haven’t got proper foundations.
DIY or contractors
As in all home improvement projects the main factor that determines whether you hire a contractor or not will be the cost. If you have a large budget then it will be no problem hiring the contractor to install the foundations and floor as well as prepare the house for the installation of the kit. Let’s just run through the list of other factors for you to consider before choosing who is actually going to do the work.
✓ As a DIY project you will be able to spread the cost of the preparation work over a long period of time.
✓ Contractors will be with you for the absolute minimum of time so you will be able to get on and use your sunroom as soon as possible.
✓ A contractor will have all the skills necessary (or will know professionals who have specialist skills) to do the various jobs needed to install the sunroom.
✓ If you use the manufacturer’s installation team they will probably only come on site once the preparation work has been finished. They will only be interested in installing the kit. However they will have much experience in fitting the kits and will be able to easily make adjustments if components do not fit properly.
✓ Most of the jobs relating to the project will require more than one person to safely complete the work. If you are doing the project yourself you will require help along the way.
✓ The independent contractor and the manufacturer’s installation team will both be fully licensed and insured. The finished sunroom will have to be properly tied into the existing building so the complete unit is watertight, weatherproof and secure. The foundations will need to be tied into the existing foundations to prevent subsidence and slippage.
✓ Most of the tasks involved with building a sunroom can be very satisfying and even fun, but there are always tasks that are a drudge. If you hire a contractor to do the work then you will be spared the difficult, messy and boring jobs.
✓ Manufacturer’s installation teams make quick work of erecting a sunroom. They know all the tweaks and tips that the designers do not share with the customer or independent contractors. Depending on the manufacturer’s quality control system, they will erect the sunroom in the factory as a dry run before arriving on site.
✓ If you choose the manufacturer supplied kit, you can be sure to have everything designed to your own specifications. You will have the following step by step procedure:
✓ You will have a salesperson call to discuss the various options available to you and to find out your specific preferences.
✓ You will be shown various catalogues and photographs of the different types of sunrooms available.
✓ If you live near to a showroom, most manufacturers have ready assembled display units you can browse.
✓ Your existing site will be measured by a qualified surveyor or estimator and you will receive a fixed price very quickly.
✓ Once you have signed the contract and paid the agreed deposit the manufacturer will start to design and build the sunroom kit.
✓ When the kit has been built to your specifications and you have paid your money you will have the kit delivered complete with full assembly instructions.
It is now up to you to have it assembled by an independent contractor, yourself or most manufacturers have their own installation team.
Conclusion
There is no doubt about it; a sunroom is probably one of the best value-for-money types of home improvement available. There are so many different choices you can add to the basic sunroom idea depending on your requirements and budget. You can have a very simple screen enclosure which is basically just a gazebo with insect screens or a self-assembly prefabricated kit to enclose your patio.
Depending on the weight and structural stability of this type you may not need foundations or even a building permit, but you should always ask your local permit office whether you need one or not. At the other end of the scale, you can have a sunroom which is basically as complex as a full house addition with foundations, flooring, electricity, heating and air conditioning. You can even have a version which is incorporated under an extension of the main house roof. There really is something for everyone. As to who should actually install the sunroom, it really depends on the homeowner’s DIY skill level.
Unless you are an expert DIY builder, then it will always be better to employ a contractor to do the work. Even a pre-fabricated sunroom kit will need excellent construction skills so as to avoid problems later on in the assembly so don’t be hoodwinked into thinking that assembling and installing a kit is child’s play. Whenever possible, and if you are buying a prefabricated kit, hire the manufacturer’s installation team to assemble it. If the sunroom is built on site then hire an independent contractor. The extra cost of hiring someone else to do the work will pay off in the long term when you are sitting protected from the cold wind in your new sunroom enjoying the warmth of a sunny spring day.
Thank you for reading and I hope you have picked up some new useful information.